Our 1000 HP Extreme-Duty rear axles for the 2010-2011 Chevrolet Camaro have been re-designed and updated to a new 1400 HP rated set-up: We are proud to introduce our updated 1400 HP Extreme-Duty rear axles for the 2010 Camaro. We were going to put a 1800 HP rating on them, but knowing the stock differential will break at about 1000 HP, we feel the 1400 HP number is impressive enough.
We recently were made aware that our 108mm outer CV and bolt system may have a clearance issue on an extremely lowered car squatting hard at the track. We took our test car through its complete suspension travel and the bolts on a 108mm CV (any thing larger or longer than our 108mm CV may be a catastrophic event bottoming the suspension out on the upper control arm) and it barely touched the rear upper control arm. With a little grinding it would clear fine, but since its a brand new car and “no one wants to grind” we have designed a new lower profile CV for this application that is not only stronger, but more cost effective to manufacture.
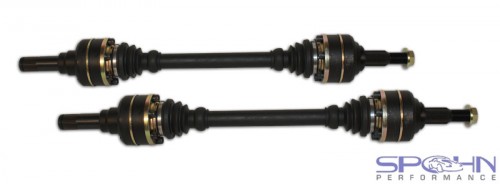
A word about axle bars: We have been doing extensive testing with some new proprietary material we have obtained from our supplier and have conducted extensive destructive testing. We found out a few things. In a high horsepower car, having one axle thicker and one thinner only causes one axle to be weaker by up to 20%. Our new axle design is made for the discerning car builder that has dealt with wheel hop issues in a proper manner and is not trying to rely on axles to stop it.
By making axles different diameters you get one weak axle and one strong axle. We have decided to make our new 1400 HP Extreme-Duty axles with two 1.375″ diameter extremely strong axles. We have worked very hard and very long on this new system to not only bring you a better choice of axles, but better axles at a better price. That’s right, not only have we designed an even stronger axle set-up, but we have been able to lower the price from $1849.95 a set to $1599.95 a set, a $250.00 savings!
Extensive Installation Instructions and Pictures: We recently installed a set of these axles on our R&D car and documented the installation with more detailed installation instructions and step by step installation pictures. See the photo gallery below.
2010+ Chevrolet Camaro SS
Installation Instructions
See the photo gallery below for step by step installation pictures
Jack up the rear of the car and support with jack stands, block the front wheels
1. Remove rear wheel with a 7/8” socket
2. Remove the axle to wheel nut with a 1.25” socket
3. Disconnect the brake line from the rear upper control arm with a 10mm wrench
4. Disconnect the ABS line from the inner rear spindle with a 10mm wrench
5. Disconnect the rear upper control arm from the rear spindle with a 18mm wrench
6. Disconnect the rear toe link from the rear spindle with a 18mm wrench
7. Disconnect the rear lower trailing arm from the rear spindle with a 18mm wrench
8. Disconnect the rear sway bar end link from the rear lower control arm. Remove the lower shock mounting bolt from the rear lower control arm with a 21mm wrench. Disconnect the rear lower control arm from the rear spindle with a 18mm wrench. Note on steps 6-8 you are only disconnecting the suspension pieces from the spindle end, do not disconnect the cradle mounted ends. There is no need to completely remove them and keeping the cradle mount ends in place will eliminate any alignment changes.
9. Pull the rear spindle off of the end of the axle and tie it up securely by wrapping a rope around the wheel studs and securing the other end of the rope to the vehicle.
10. Pull the axle out of the rear end
11. Generously grease the splines on the differential end stub end of the new axle
12. Hold the axle so the c-clip is facing DOWN on the differential mounted stub end
13. Gently slide the axle in to the differential (c-clip facing DOWN) until you hear and feel it bottom out. If you need to tap the axle in to the differential be sure to use a block of wood between the axle and the hammer so you do not mar the spindle stub’s splines.
14. Generously grease the splines on the spindle end stub end of the new axle
15. Untie your spindle and slide it over the end of the axle
16. Install the rear upper control arm’s mounting bolt in to the spindle mount hand tight only
17. Install the rear lower trailing arm’s mounting bolt in to the spindle mount hand tight only
18. Install the rear lower control arm’s mounting bolt in to the spindle mount hand tight only
19. Install the rear toe link’s mounting bolt in to the spindle mount hand tight only
20. Install the rear lower shock mount bolt through the rear lower control arm hand tight only
21. Install the rear sway bar end link mounting bolt through the rear lower control arm’s mount hand tight only
22. Now go back and tighten Steps 16-21 to the proper torque specifications (see below)
23. Reinstall and tighten the brake line to the rear upper control arm
24. Reinstall and tighten the ABS line to the rear spindle
25. Install the axle to wheel nut and torque to 199 ft/lbs. with a 1-5/16” socket. You will need to apply the hand brake before attempting to torque the nut. Do NOT re-use the stock axle to wheel nut. Use the axle to wheel nut that was supplied with your new axle.
Torque Specifications:
Step 16 – Rear Upper Control Arm to Spindle Bolt: 44 ft./lbs.
Step 17 – Rear Lower Trailing Arm to Spindle Bolt: 30 ft./lbs.
Step 18 – Rear Lower Control Arm to Spindle Bolt: 35 ft./lbs.
Step 19 – Rear Toe Link to Spindle Bolt: 103 ft./lbs.
Step 20 – Rear Lower Shock Mounting Bolt: 59 ft./lbs.
Step 21 – Rear Sway Bar End Link Mounting Bolt: 36 ft. lbs.
All bolts on the axles themselves are torqued to 57 ft./lbs.